


J.A.R.V.I.S. for PMs: Automate Anything with n8n and Any MCP Server
A Practical No-Code Guide to Setting Up Free n8n Community Edition and Building Voice AI Agents

Hey, Paweł here. Welcome to the premium edition of The Product Compass Newsletter.
With 106,254 Product Managers from companies like Meta, Amazon, Google, and Apple, this newsletter is the #1 source for learning and growth as an AI PM.
Consider subscribing and upgrading your account for the full experience:
Recently, we discussed what MCP servers are and how to use them in Claude Desktop to automate Figma → Jira (Epics, Stories). I also shared hundreds of ready-to-use MCP servers.
While Claude Desktop is helpful, in practice, you often want your AI agents and agentic workflows to run in the background and trigger automatically, e.g.:
Handle incoming emails for you.
Create a competitors research report every Monday.
Handle requests from other systems.
Act as a customer support voice AI agent that can help with common issues.
My favorite platform, n8n, makes that easy to do.
But whether cloud or free Community Edition, n8n doesn’t support all MCP servers.
After 3-week research, I’m sharing the only n8n setup that can handle all MCP server types: SSE (remote), npx (local, Node.js), uvx (local, UV) with step-by-step instructions. You won’t find this anywhere else.
But first, a demonstration.
Meet J.A.R.V.I.S., my personal voice AI assistant that can work with Jira, access Google docs, and send emails:
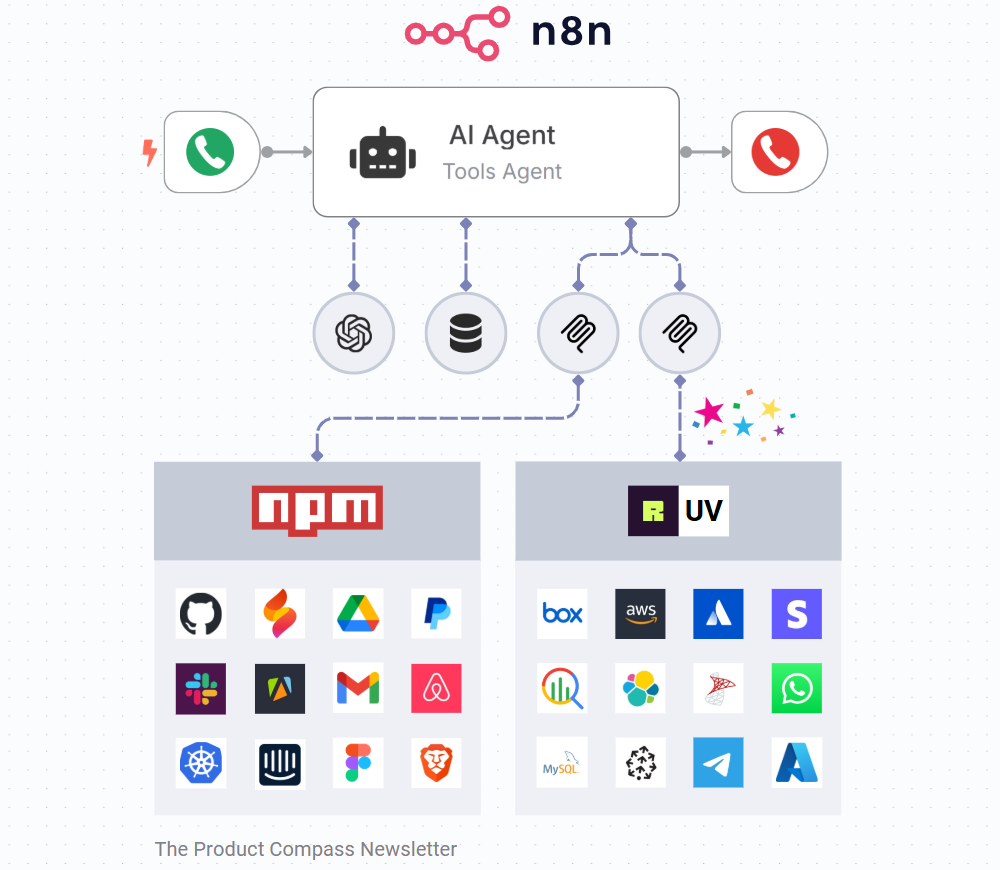
Unlike other n8n images, our setup supports UV MCP servers, so the agent can access tools like:
Next, let’s discuss (no coding):
How to Setup a Custom n8n With UV Locally
How to Setup a Custom n8n With UV in the Cloud
🔒 How to Build an AI Agent Using n8n
🔒 How to Build an AI Voice Agent
Before we proceed, I’d like to recommend the AI Product Management Certification. It’s a six-week cohort taught by instructors like Miqdad Jaffer.

I participated in the cohort in Spring 2024. The next session starts on April 26, 2025.
I was able to secure a $250 $500 discount for our community if you use this link to sign up:
1. How to Setup a Custom n8n With UV Locally
This configuration allows you to run a free n8n edition on your local machine.
Important: This is the most straightforward setup, but it might not be the best choice if you want external services to communicate with your workflows through webhooks. In that case, you need to setup additional https endpoints.
Steps:
Install Docker Desktop. It will allow you to create a virtual n8n container.
Download the following files and place them in the same folder:
Run the following commands in the command line (one after another):
docker-compose down
docker-compose build --no-cache
docker-compose up -d
After the setup completes, you can access n8n in the browser (http://localhost:5678)
Create an account and get a free activation key (you will get it by email)
Install the “n8n-nodes-mcp” community node after navigating to http://localhost:5678/settings/community-nodes
The entire installation with my comments:
I will answer your questions and perform live demos on Tuesday during our open hour. The recordings of those sessions are available for premium members. For more information, join our Slack.
2. How to Setup a Custom n8n With UV in the Cloud
This configuration allows you you to run a free n8n edition in the cloud and gives you more options out of the box. It requires $13-15 month if your server runs 24/7.
Below, I present detailed steps for elest.io DevOps platform. You can achieve similar results using DigitalOcean.
Steps:
Create a new elest.io account
Create a new “n8n” service with at least 2GB or RAM
Open the service, go to “Tools,” and click “Explore Files”
Open the “docker-compose.yml”
Find and replace the following line:
image: n8nio/n8n:${SOFTWARE_VERSION_TAG}With this one that will use our custom Dockerfile:
build: .
Create a new file “Dockerfile”. Edit it and paste this content inside it.
Open the elast.io Terminal
Run the following commands (one after another):
cd /opt/app
docker compose down
docker compose build --no-cache
docker compose up -d
After the setup completes, open n8n in the browser
Create an account and get a free activation key (you will get it by email)
Go to Settings > Community Nodes and install the “n8n-nodes-mcp” node
The entire installation with my comments:
3. How to Build an AI Agent Using n8n
What I love about n8n workflows is that they can run in the background and trigger automatically.
With our configuration, you can connect them to:
Any MCP server.
Hundreds of ready-to-use tools.
And even AI voice agents (more in the next point).
How to do it?
First, I’ll demonstrate the following AI agent. It’s is a copy of my AI voice agent without the audio interface:

A step-by-step video with my comments + workflow template: 👇
Keep reading with a 7-day free trial
Subscribe to The Product Compass to keep reading this post and get 7 days of free access to the full post archives.